Ricardus · @Ricardus
1104 followers · 27349 posts · Server mastodon.sdf.orgRicardus · @Ricardus
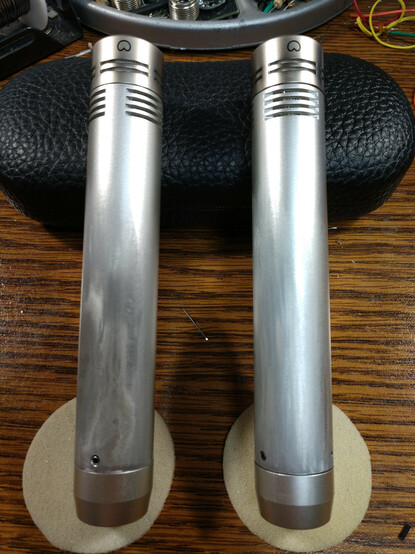
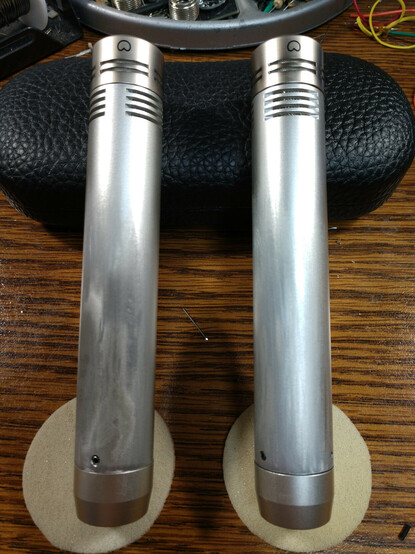
1104 followers · 27348 posts · Server mastodon.sdf.orgGot KM84 clone number 2 done a few moments ago. The learning curve from having done the first one helped immensely with getting this one finished quickly. Biasing the FET was much quicker this time too since I learned a way to limit the 60 Hz hum while viewing the 1K sine wave on the scope.
Onto a large diaphragm version of this next. Someone took this circuit and modded it for large diaphragm mic capsules and made a PCB that fits perfectly into an inexpensive mic body.
Ricardus · @Ricardus
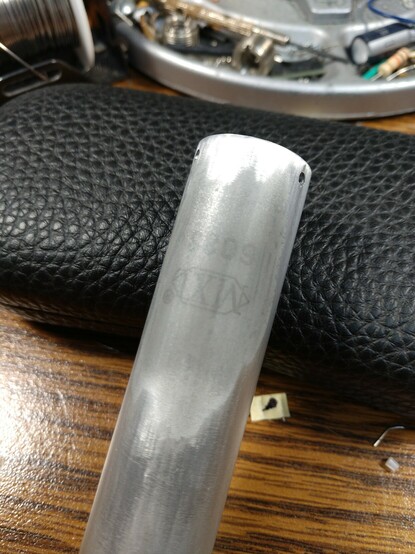
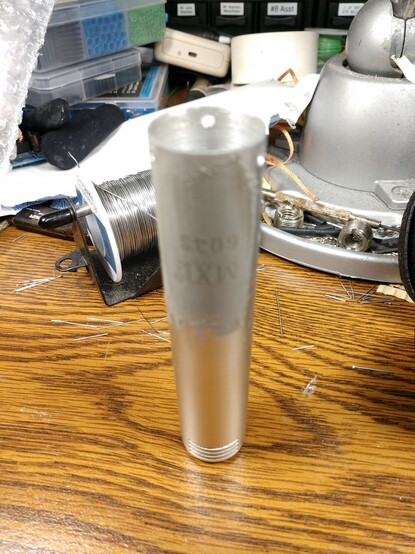
1100 followers · 27321 posts · Server mastodon.sdf.orgI'll get KM84 clone #2 basically finished tomorrow, as well. Then at some point I need to repaint the main bodies. I filled the MXL logos with bondo, so a re-spray is in order (see attached photo).
These were quite the adventure. Because of the cheap nature of the MXL bodies I had to drill out stripped set-screws, and retap for slightly bigger ones. I had to relocate some holes because of that as well. But at the end of the day these are going to be pretty cool.
Ricardus · @Ricardus
1100 followers · 27320 posts · Server mastodon.sdf.orgOK, I set aside this weekend for "finishing" the KM84 clones. I've had all the stuff to finish them for a couple weeks, but last weekend I wasn't feeling well.
Got the transformer soldered, wired the XLR, and soldered the capsule contact lead to the PCB, applied phantom power, and voila... NO SMOKE. It even made a sound when you tapped on it. Got the FET biased properly and it sounds super cool.
I had a small issue after my initial bias attempt but I got past it.
Here it is.
Ricardus · @Ricardus
1104 followers · 27259 posts · Server mastodon.sdf.orgI intended to go into the lab and do some soldering today to get one of the KM84s "working," but nerve pain had its own ideas. No real rush but I would rather have been doing that.
I'll try to do some bits and pieces during the week, and then next weekend also.
Ricardus · @Ricardus
1081 followers · 27027 posts · Server mastodon.sdf.orgOK, coolio. The transformers have arriven. Seen here in this glamour pic are the transformers used in my KM84 clones. These transformers are high quality clones of the original Neumann BV107, but since these are still being made, you can actually buy them, and for a reasonable price. Maybe I'll have working mics by the weekend. But then again, it IS new years weekend, so maybe there will be less building and more partying.
Ricardus · @Ricardus
1081 followers · 27024 posts · Server mastodon.sdf.orgOoh! Super excited. Just got confirmation that the transformers for the KM84 clone build were delivered. Woot!
Pictures later.
Ricardus · @Ricardus
76 followers · 216 posts · Server mastodon.sdf.orgOK, the transformers for my KM84 clones have shipped. Can't wait to bias these bad boys up and hear how they sound.
Ricardus · @Ricardus
72 followers · 106 posts · Server mastodon.sdf.orgOk, I think I have the embossed MXL logos filled and sanded to the point where you won't see them with a code of primer and paint on it. So I think I'm ready to shoot these with some primer.
Ricardus · @Ricardus
65 followers · 93 posts · Server mastodon.sdf.orgGonna sand some Bondo and get my KM48 clone bodies super smooth and sexy, tomorrow. Might have to hit them with another coat of Bondo. We'll see.
Ricardus · @Ricardus
55 followers · 82 posts · Server mastodon.sdf.orgOK,matched cardioid capsules have arriven. They fit the MXL donor bodies perfectly, and they should make these mics sound amazing. Can't wait ti finish them.
Ricardus · @Ricardus
54 followers · 79 posts · Server mastodon.sdf.orgLooks like the matched Cardioid capsules for my #KM84CloneBuild have arriven. I'll post a pic when I get to my shop. I'm excited. Now all I need is the transformers to get these finished up.
Ricardus · @Ricardus
33 followers · 56 posts · Server mastodon.sdf.orgI bought a rubber metal-forming block to shape these badges that need to go on the curved mic bodies on the left. So I found a socket of similar size put a extension on it for a handle, turned the little logo badge upside down and oriented it correctly, put the socket over it and then struck it hard with a big mallet. And I got a fairly perfectly curved emblem that will fit over the mic body nicely. This is for the Neumann KM84 mic clones that I am building.
Ricardus · @Ricardus
12 followers · 51 posts · Server mastodon.sdf.orgWith luck the capsules that I ordered for my #KM84CloneBuild will be here Thurs or Fri. Then I still need to order the transformers before I they will be usable.
Of course I need to finish repainting them, also.
Ricardus · @Ricardus
1 followers · 8 posts · Server mastodon.sdf.orgI applied some of this fancy schmancy metalized Bondo to the old MXL logo to fill in the embossed letters on these SDC mic bodies. I'll do a few coats and then do a light sanding and see where we are.
Ricardus · @Ricardus
968 followers · 26617 posts · Server mastodon.sdf.orgSo I bought a rubber metal-forming block to shape these badges that need to go on the curved mic bodies on the left. So I found a socket of similar size put a extension on it for a handle, turned the little logo badge upside down and oriented it correctly, put the socket over it and then struck it hard with a big mallet. And I got a fairly perfectly curved emblem that will fit over the mic body nicely.
Ricardus · @Ricardus
970 followers · 26556 posts · Server mastodon.sdf.orgJust as an FYI this is the filler I'll be using to fill in the logo on those mic bodies. This stuff is supposed to be the bomb-skiddley-shiznit.
Ricardus · @Ricardus
970 followers · 26556 posts · Server mastodon.sdf.orgSo when I was using nail polish remover to remove the black silk screening or whatever it was in the embossed MXL logo, the silver finish came off also.
So after I fill and sand the MXL logo smooth, I'll need to repaint them.
Rattle cans put paint on too thick, don't they? Or is there a thinner one that's more like the consistency of airbrushing?
What airbrush paint would anyone recommend that can stand up to being handled?
Ricardus · @Ricardus
970 followers · 26533 posts · Server mastodon.sdf.orgDrilled a bunch of holes today that needed to be tapped for #3 set screws. Yep. SMALL holes. It all went pretty well, but the real issue was I didn't have any sort of jig to hold the piece I was drilling, which was a weird shape. So 5 holes came out great and the tap worked well, but one of the holes moved while I was drilling it, and the hole ended up being a bit too big and didn't tap tight enough to hold the tiny set screws.
That said, all in all I'd call it a win.
Ricardus · @Ricardus
960 followers · 26485 posts · Server mastodon.sdf.orgGotta drill those precision holes on the weekend and tap them for the #3 set screws I'll be using in the #KM84CloneBuild . Not looking forward to it since I don't have the drill press I need to do the job properly, but hopefully I'll figure it out.


